- This topic has 17 replies, 6 voices, and was last updated 5 years, 4 months ago by

 tractorbuilder2205.
- AuthorPosts
- August 16, 2015 at 10:48 pm #763
 RC Tractor GuyKeymaster
If you have an questions about the simple RC controller made from the Arduino Uno, the joystick shield and the NRF24L01 radio module then this is the place to ask them.
August 18, 2015 at 10:21 am #824RC Tractor GuyKeymasterHere is a picture of the basic controller.
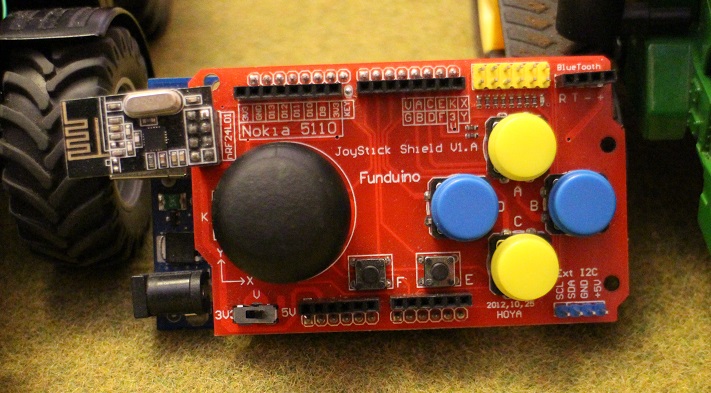

- This reply was modified 8 years, 8 months ago by RC Tractor Guy.
August 19, 2015 at 5:28 pm #899RC Tractor GuyKeymasterHere is the code for the basic RC controller
/*
Basic Arduino Controller Code Version 1.0
This code was written by Oisin O'Conchubhair for the website www.rctractorguy.com
The code is intended to be used with an Arduino Pro Uno with a joystick shield
and NRF24L01 radio module
*/

// Define variables
int Joy_X = 0x00;
int Joy_Y = 0x00;
int Joy_X_Old = 0x00;
int Joy_Y_Old = 0x00;
int Data_Check_Timer = 0;
int Active_Vehicle = 0;
int Num_Vehicle = 1;
int Controller_Mode = 0;
int A_Button = LOW;
int B_Button = LOW;
int C_Button = LOW;
int D_Button = LOW;
int E_Button = LOW;
int F_Button = LOW;
int Joy_Button = LOW;
int X_Hold = 0;
int Y_Hold = 0;

#include <SPI.h>
#include "RF24.h"

RF24 radio(9,10);

// Controller Address
const uint64_t pipe = 0xE8E8F0F0E1LL;

/*-----( Declare Variables )-----*/
uint8_t command[16];  // 2 element array of unsigned 8-bit type

void setup()
{
  pinMode(2, INPUT_PULLUP);  // A Button
  pinMode(3, INPUT_PULLUP);  // B Button
  pinMode(4, INPUT_PULLUP);  // C Button
  pinMode(5, INPUT_PULLUP);  // D Button
  pinMode(6, INPUT_PULLUP);  // E Button
  pinMode(7, INPUT_PULLUP);  // F Button
  pinMode(8, INPUT_PULLUP);  // Joystick button

 radio.begin();
 radio.openWritingPipe(pipe);
 }

void loop() {
  Check_Vehicle_ID();
  Check_Buttons();
  Check_Pots();
  Regular_Data_Check();
}

void Check_Vehicle_ID(){
  //Check which vehicle is active
  if(Active_Vehicle == 0){
    command[0] = 0x4D;  // M
    command[1] = 0x38;  // 8
    command[2] = 0x36;  // 6
    command[3] = 0x38;  // 8
  }
  else if(Active_Vehicle == 1){
    command[0] = 0x4A;  // J
    command[1] = 0x44;  // D
    command[2] = 0x38;  // 8
    command[3] = 0x33;  // 3
  }

}

void Check_Buttons(){
  // Check Joystick Switches
  A_Button = digitalRead(2);
  B_Button = digitalRead(3);
  C_Button = digitalRead(4);
  D_Button = digitalRead(5);
  E_Button = digitalRead(6);
  F_Button = digitalRead(7);
  Joy_Button = digitalRead(8);

if (A_Button==LOW)
  {
    if (command[10] != 2){
      command[10]=2;  // Command to turn on head lights
    }
    else {
      command[10]=0;  // Command to turn off head lights
    }

    // Wait for switch to be released
    while (A_Button == LOW)
    {
      A_Button = digitalRead(2);
    }
    Send_Data();
  }

if (C_Button==LOW)
  {
    if (command[11] != 1){
      command[11]=1;  // Command to turn on work lights
    }
    else {
      command[11]=0;  // Command to turn off work lights
    }

    // Wait for switch to be released
    while (C_Button == LOW)
    {
      C_Button = digitalRead(4);
    }
    Send_Data();
  }

  if (D_Button==LOW && B_Button==LOW)
  {
    if(command[12]!=3){
      command[12]=3;  // Turn on Hazard Lights
    }
    else{
      command[12]=0;  // Turn off Indicators
    }

    // Wait for switch to be released
    while (D_Button == LOW || B_Button==LOW)
    {
      B_Button = digitalRead(3);
      D_Button = digitalRead(5);
    }
    Send_Data();
  }
  else if (B_Button==LOW)
  {
    if(Controller_Mode == 0){
    if (command[12] != 1){
      command[12]=1;  // Command to turn on right indicator
    }
    else {
      command[12]=0;  // Turn off Indicators
    }
  }
    else{
      if(Y_Hold != 1){
      Y_Hold = 1;
      }
      else{
      Y_Hold = 0;
      }
    }

    // Wait for switch to be released
    while (B_Button == LOW)
    {
      B_Button = digitalRead(3);
    }
    Send_Data();
  }
  else if (D_Button==LOW)
  {
    if(Controller_Mode == 0){
    if (command[12] != 2){
      command[12]=2;  // Command to turn on left indicator
    }
    else {
      command[12]=0;  // Turn off Indicators
    }
    }
    else{
      if(X_Hold != 1){
      X_Hold = 1;
      }
      else{
      X_Hold = 0;
      }
    }

    // Wait for switch to be released
    while (D_Button == LOW)
    {
      D_Button = digitalRead(5);
    }
    Send_Data();

  }

  if (E_Button==LOW)  //E button cycles through controller modes
  {
    if(Controller_Mode != 1){
    Controller_Mode = 1;  //Enter accessory control mode
    }
    else{
    Controller_Mode = 0;  //Enter drive mode
    }

    // Wait for switch to be released
    while (E_Button == LOW)
    {
      E_Button = digitalRead(6);
    }
    Send_Data();
  }

  if (F_Button==LOW)  //F button cycles through vehicles
  {
    if(Active_Vehicle != Num_Vehicle){
    Active_Vehicle = Active_Vehicle + 1;
    }
    else{
    Active_Vehicle = 1;
    }

    // Wait for switch to be released
    while (F_Button == LOW)
    {
      F_Button = digitalRead(7);
    }
    Send_Data();
  }

  if (Joy_Button==LOW)
  {
    // Function for joystick button goes here

    // Wait for switch to be released
    while (Joy_Button == LOW)
    {
      Joy_Button = digitalRead(8);
    }
    Send_Data();
  }
  }

void Check_Pots(){
  Joy_X = analogRead(A0);
  Joy_X= map(Joy_X, 0, 1024, 0, 255);
  Joy_Y = analogRead(A1);
  Joy_Y= map(Joy_Y, 0, 1024, 0, 255);

  if(Joy_X != Joy_X_Old || Joy_Y != Joy_Y_Old){

    if(Controller_Mode == 0){
    command[5]=Joy_Y;
    command[7]=Joy_X;
    }
    else{
        if(X_Hold == 0){
          command[9]=Joy_X;
        }
        if(Y_Hold == 0){
          command[6]=Joy_Y;
        }
    }

    Send_Data();

    Joy_X_Old=Joy_X;
    Joy_Y_Old=Joy_Y;
  }

}

// Function to send the data
void Send_Data(){
  radio.write(command, sizeof(command));
  Data_Check_Timer = 0;
}

// Send data in regular intervals to prevent tractor loosing control
void Regular_Data_Check(){
  Data_Check_Timer=Data_Check_Timer+1;
  if(Data_Check_Timer=1024){
    Send_Data();
  }
}
January 8, 2016 at 10:05 am #1473cksmayaParticipantI can not find the receiver program may share program related to the receiver it? There Will mean the program of this line.Think very much.
void Check_Vehicle_ID(){
//Check which vehicle is active
if(Active_Vehicle == 0){
command[0] = 0x4D; // M
command[1] = 0x38; // 8
command[2] = 0x36; // 6
command[3] = 0x38; // 8
}
else if(Active_Vehicle == 1){
command[0] = 0x4A; // J
command[1] = 0x44; // D
command[2] = 0x38; // 8
command[3] = 0x33; // 3
}January 8, 2016 at 12:34 pm #1475RC Tractor GuyKeymasterThe first vehicle in the code is a Massey 8680 which is identified with the code:
command[0] = 0x4D; // M command[1] = 0x38; // 8 command[2] = 0x36; // 6 command[3] = 0x38; // 8The code for the receiver of that tractor is found here and is described as the code for the Arduino in the cab of the RC Massey 8680. I needed extra pins for this model so a second Ardiuno in the body of the tractor controls the motors and other LEDs, this code is described as the code for Arduino in the body of the tractor.
January 9, 2016 at 3:35 am #1476cksmayaParticipantThank you reply. Hello I would like to ask some questions. The transmitter code is a transmitter can control two different cars? The second question, I crane it has three movements (arm up down and arm lift right turn and load up down), 3 limit determined switch (up limit and down limit and load up limit), a push button switch control solenoid (attract small paperclip, write the name of the gift card inside), I want to use the RC tractor Guy modify basic controller functions to control the crane, I would like to advise you how to do? Can I crane prototype photos posted on the forum?
January 9, 2016 at 3:35 pm #1479RC Tractor GuyKeymasterYes the code can control two or more RC cars so it is different to your code, I’ll make a start on some new code for you since I think I see an easy way to do what your want. I’ll post the code here because it’s quite different to this code.
January 10, 2016 at 10:23 pm #1486cksmayaParticipantThank you for your help
January 20, 2016 at 4:32 pm #1529oldboyParticipantIs it posable to wire in another joystick onto the right of this RC controller using a PCB board. But i expect this would mean changing the codes. If this is not posable can you control the tracks on the 8360RT build from the one joystick, forward/reverse left/right.
January 21, 2016 at 2:08 am #1535RC Tractor GuyKeymasterYes you have 6 analogue inputs on an Arduino Uno so that is six potentiometers, there are two per joystick so you can have up to 3 joysticks.
I am working on new code as I’ve made many changes to suit the new controller I designed and one change I plan to make is to change the tracked tractor code so that I can control it in the same way as the other tractors. The reason is that it makes the code more manageable when your controller has to deal with many different vehicle configurations and it will allow me to control the tracked tractors using the basic controller if I need to.
January 23, 2016 at 2:41 pm #1537oldboyParticipantHi Thank you for you help could you answer one no two question for me I have looked to see how a second joystick could be wired in if you are using a joystick shield with one already attached and would this affect the codes. Thank you for pointing out the Schematic drawings they are very easy to follow. I see you are using a 5volts Arduino in the body!! One other thing I want to use the 3.7volts LiPo battery to drive the tractor and not have back up from a trailer. I think I will have to constructed a way to change the battery my often. Just waiting for the rest of my parts to come through. I have the Tractor, and I will braze a small plate onto the end of the axle cut it in half first and fix this to the outside of the rear wheels because there is a nice large cover that covers that part. Thanks again it is great that there is someone to ask.
February 8, 2016 at 8:08 pm #1555NishitokuParticipantHi,
is there an exsample of reciever code, that fits to this basic transmitter code?
I have the arduino shield with 6 buttons + joystick and the Massey 8680 code for 2 arduinos in cab and body is a bit overkill for my first project.
I find it dificult to merge the code for cab and body into one codepice for one single body-arduino.I basicly only need joystick x + y for speedcontrol and steering and the 6 buttons for light, front hydraulic-servo and a trailer function.
Btw: Thanks for all the inspiring content!
February 17, 2016 at 4:48 pm #1579RC Tractor GuyKeymasterTo be honest the code has changed so much over the last year I have trouble remembering which codes work together 🙂 I’ve been working on new code for the controller I designed so today I went back and modified the code for the basic controller to match.
Click here to view the controller code
Click here to view some example tractor code
These are in library form to make it easier for most people, you might want to modify the code yourself. If you just need to modify the command string you can do that and update it as shown in the example. If you need to do more then just right click on the .cpp file and change whatever you want there rather than the sketch is probably the best way to do it.
I hope that helps.
February 20, 2016 at 9:11 am #1587NishitokuParticipantThis really helps a lot.
Thank you so much!
This tractor projects are phantastic. One has to solve so many different machanical, electonical and software problems which are all interwoven 🙂February 21, 2016 at 1:33 pm #1590RC Tractor GuyKeymasterThe tractor projects are good fun if you enjoy the electronics but it sure takes a lot of time 🙂
- This reply was modified 8 years, 8 months ago by
- AuthorPosts
You must be logged in to reply to this topic.